
Growing Plants from Cuttings
It is possible to grow a whole new plant from a tiny piece because plants possess TOTIPOTENCY, which means that every living cell of that plant contains the genetic information necessary for reconstituting all the plant parts and functions!
The drawback to cloning is the lack of genetic diversity, which keeps a species strong and vigorous and better able to survive natural ecological disasters. Keep that in mind before filling your garden with multiple clones of just one “mother” plant!
The advantage to cloning is that the resulting plant is an exact duplicate of the parent plant, including the age of the parent plant. To a propagator that means that perennial plant can be grown to maturity, and will bloom and set fruits, sometimes within just months. It also will retain the attributes that made the parent plant a stunning or exceptional specimen.
In cloning plants, we are taking advantage of adventious roots; each node, or bud, on the stem are sites of meristematic tissues, which are regions of active cell division. The apical meristem, or the growing tip of the plants is the most active place of cell division. When we “tip prune” to create a more bushy, dense shape for our plants, we are removing the apical meristem and allowing the lateral meristems (the side shoots) to grow more vigorously. Plants produce a hormone called auxin, which controls many plants functions, including growth patterns.
The first response to a wound on the stem is for scar tissue to form as a protection against pathogens. Then the cells in the vascular tissues begin to divide and initiate growth. If these nodes are exposed to light and warmth, they will grow stems and leaves. If the nodes are exposed to a moist, dark medium, roots will grow from the nodes.
Good selection and proper care and handling of your propagules will result in a higher success rate. Again, it pays to think like nature and really observe the growth patterns and tissue conditions of the plant you wish to clone. When a plant is putting energy into fresh new growth, vegetative propagation will probably be easily accomplished. If the plant is directing its energy into setting flowers or fruits, there will not be much energy for vegetative growth.
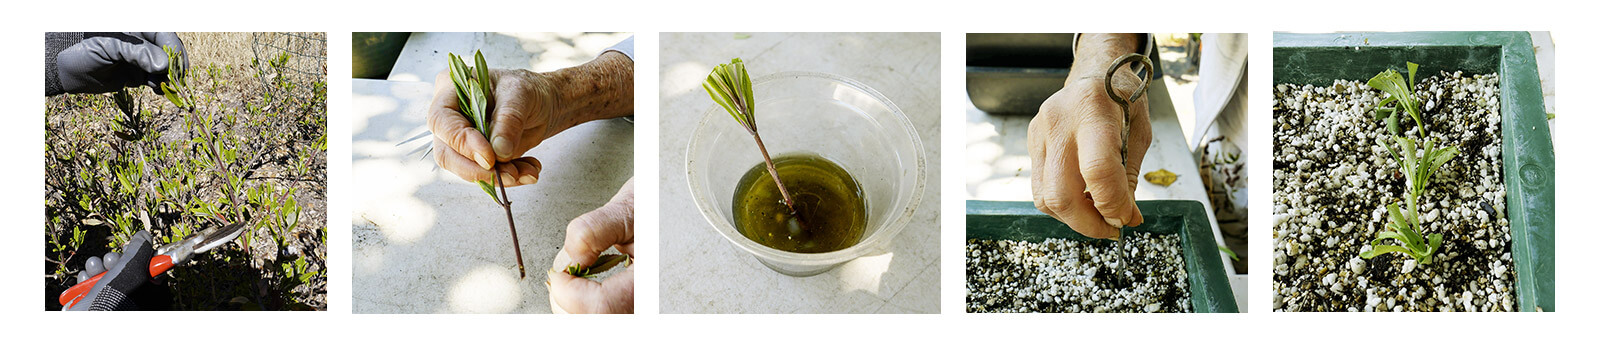
A mature plant can be prepped for cloning by pruning to encourage new growth, and then utilizing this vigorous new growth for tip or greenwood cuttings. The best time to take cuttings is in the cooler mornings, when plants are the most turgid. I work mostly with tip cuttings, and take the first cut with an eye towards careful pruning and shaping of the plant.
I wrap these cuttings right away in moist paper towels and put them into a plastic bag. If I’m away from home I’ll bring a small cooler with an ice pack to hold the cuttings until I get home. If I can’t prepare and strike the cuttings that same day, I can keep them in the refrigerator for about a week, until I have the time to work with them.
To prepare a cutting for cloning, first I strip all of the leaves from the stem, except for a small number of them right at the tip. I count down about four or five nodes below the tip and cut off the rest of the stem. I use my thumbnail to gently scrape some of the stem area around each of these nodes. Then I trim back most of the remaining leaves by cutting off the outer half. People are usually shocked at how much I’ve reduced it, but it’s necessary because it helps the cutting put more energy into growing roots rather than maintaining leaves.
I always us a soilless medium to strike (plant) the cuttings; a good mixture is one-third each of peat, perlite, and vermiculite, thoroughly mixed and moistened. I use trays with a perforated bottom (upward migration worm box trays are really good for cuttings) or I’ll set up a two or three gallon clean nursery container with a one to two inch layer of drainage rock at the bottom, and the balance filled with the soilless medium. A cutting tray or pot has to drain well, but also stay moist.
There are lots of different mixes and mediums that can be used, and they should all be sterile. I like to re-use the soilless medium as much as possible, so in between batches of cuttings, I will drench the medium with a hydrogen peroxide drench, let it sit for a day and then follow with a thorough rinsing of fresh water.
To “strike” a cutting, use a skewer to create a hole in the medium to place the stem into; don’t just push on the stem because it’s too easy to damage it. Sometimes I’ll use a commercial rooting hormone, (primarily auxin) either a gel or a powder. I like Olivia’s Cloning Gel when I work with dry cuttings, and Bontone Rooting Powder when I work with cuttings that I soak in water first. Sometimes the species is so amenable to rooting (like most of the mint family plants) that hormones are not necessary.
Be sure to label your cuttings with: species name, date the cuttings are struck, how many, and what type of rooting hormone, if any, you may have used. You can also make notes about the progressive growth of the cuttings, when roots are starting to form, when new leaves are growing, and when you pot them up into soil.
To check on how the cuttings are progressing, just try a gentle pull on the stem of the cutting; if there is resistance, then roots are starting to form. It’s a good idea to check the growth regularly, and it is also important to clean up any dropped leaves, and remove obviously dead cuttings. When you notice fresh, whole new leaves developing, there is, most likely, also a good root system formed, and the cutting is ready to pot up into soil.
In potting up a rooted cutting, remove it gently from the cuttings tray or pot (a hori hori knife is a good tool for this), leaving some of the rooting medium around the new root structure. Pot it up into the correct size pot—not too big and not too small. Keep these newly potted plantlets in the shade and well watered for at least a week before gradually moving them out into the preferred sun/shade exposure for the species.
The inherent ability to grow from cuttings varies by degree among plant species; with some species it is quick and simple, in other species it can be challenging and take a long time! Our job as plant propagators is simply to set up the life support systems needed to facilitate these processes.
LIFE SUPPORT SYSTEMS
Water is necessary for uptake of nutrients within the plant tissues.
Water vapor and humidity helps to reduce the rate of transpiration.
Oxygen is necessary to enable tissue respiration, both around the leaves, and at the base of the cutting where missing tissues (roots) will be forming.
Low level, but bright light allows some photosynthesis to take place.
Temperature should be kept fairly stable, with the optimum range being 55 to 75 degrees. Cuttings may still root at a lower temperature, but it will take longer.
Classes
Habitat Garden Summer Camp July 8-12 2024 Open to incoming 2nd-5th Grades Home Ground Habitats in Novato is excited to announce our first annual Habitat Garden Summer Camp for children. Click here for more information Plant Propagation Classes July – Sept 2023...Complete Garden Guide to Native Shrubs of California
Worth hunting for.Complete Garden Guide to the Native Perennials of California
Worth hunting for.Secrets of Plant Propagation
<none>
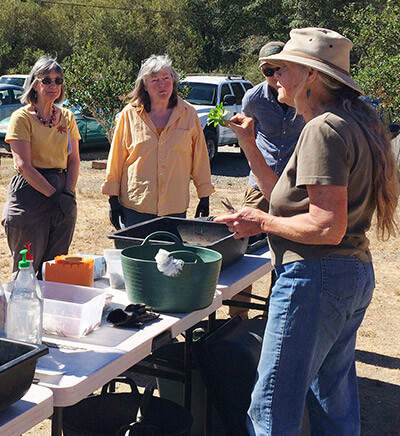
Charlotte teaching a class on propagating plants from cuttings.
Handouts
Recommended Reading
Plant Propagation
American Horticultural Society Plant Propagation: The Fully Illustrated Plant-by-Plant Manual of Practical Techniques
1999
Complete Garden Guide to Native Shrubs of California
1990
Worth hunting for.
Complete Garden Guide to the Native Perennials of California
1990
Worth hunting for.
Creative Propagation, 2nd Ed.
2005
Making More Plants: The Science, Art and Joy of Propagation
2012
Propagation Handbook: Basic Techniques for Gardeners
1995
Secrets of Plant Propagation
1985