
Sowing Your Seeds
After they fall or are blown from the plant—or are eaten—most seeds are exposed to conditions that provide an essential trigger for them to start growing at the appropriate time and in a beneficial location. Some need mositure, or sun, or fire, or to pass through the digestive track of an animal. These are called pre-germination experiences and you, the propagator, can recreate these in your home nursery. See the handout, Pre-Germination Techniques, at right, for full details on how to treat different types of seed before planting.
A rule of thumb is to plant a seed no deeper that twice its diameter. The size of the seed equates to its food reserve (the cotyledons), which equates to the distance it can grow before being able to produce its own food.
The most common mistake people make when preparing to start from seed is that the medium they are sowing into is too loose and fluffy! In loose mediums, after watering the soil settles a bit, and seeds drift down too far to grow to the surface. There are also air pockets in loose mediums that can be damaging to new roots.
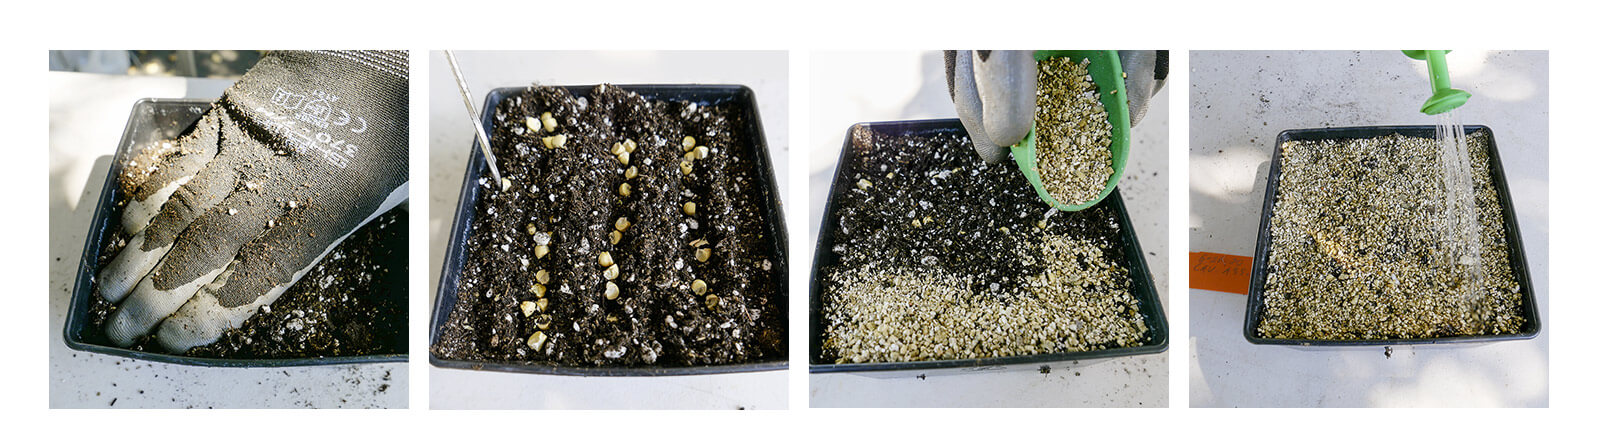
It is counter-intuitive, but when preparing a seed bed, the soil medium needs to be densely packed in, really tamp it down, so that the seeds, especially tiny ones, stay close to the surface. If you are using 4” pots to start your seeds, your closed fist will do a good job of tamping the soil down; if you’re preparing a larger flat, then a small board works really well to tamp the soil medium down evenly.
Furrows can be created for large seed; medium seeds can be sown on top of the soil mix, and then covered with vermiculite to the top of the container. For tiny seeds, fill your container with a properly tamped in soil mix, cover this mix with a thin layer of vermiculite or perlite, then sprinkle the seeds on top. The seeds will settle into the tiny spaces between particles of the soil covering. Then press it all down thoroughly to ensure good seed-to-soil contact, and water in your seeds.
If you have the seed flat set up indoors, with bottom heat and a grow-light be sure to water your seed flat every day; the soil medium needs to be kept moist, but not soggy. Plastic lids designed to fit tightly over the seed tray can be used to help maintain moisture levels. Plastic food wrap also seals in moisture and warmth but prop it up on little sticks to make sure that it doesn’t rest on the soil. It is important to keep the growing medium moist but not soggy wet, once germination has occurred. The new seedlings must not be allowed to dry out; they are extremely vulnerable at this stage. Always water seedlings with water that is at room temperature!
As soon as you notice the first green growth, remove the covering, at least temporarily, to avoid conditions that may lead to damping-off which can kill new seedlings.
When transplanting seedlings, always handle them by the leaves, NOT the stem! Seedlings are often very delicate and the stem is the lifeline; one can inadvertently crush it and thus kill the seedling. Leaves are much more expendable and will usually regrow.
Record Keeping
I keep a notebook with pages in alphabetical order and dedicate a page or pages, for each species of plant that I have tried to propagate over the years. I try to keep track of both successes and failures, and when I realize that a certain approach worked well or did not work at all, I’ll add that to my notes.
Sometimes I’ll try multiple approaches to propagating the same species. It’s great to have the freedom to experiment, and sometimes with experience, you just develop an instinct about what might work best for a particular plant. Then, the next time I have an opportunity to try again with a species, I can refer back to my prior experience.
Noting the following helps to create a body of knowledge:
Botanical name, and when and how the seed was acquired
note if the seed is old and if you did a viability test
Date when the seed was sown
Conditions the seed has been sown in
soil mix (if it’s different than your standard)
inside or outside?
lid or covering over the seed flat?
bottom heat?
grow-light? and if so how many hours of light?
Note the date of the first germination
note whether it is scant, just one or two seedlings
note if germination occurs over a period of time
Note the date the first true leaves appear
Note the date if and when you thin the seedlings
Note the dates of progressive transplants, and pot sizes
note the numbers of seedlings you transplant and the number that survive to maturity
Helping Seeds Sprout
Some seeds have built-in mechanisms that prevent germination until ideal conditions are met. Even when perfect conditions are met, some of the ‘seed bank’ of a species will not germinate. They will wait, often camouflaged in the duff, as an insurance policy against a...